Author: Garagistic
0
251

on

This guide should only be used to help you as a suggested way to fix your equipment. They are not intended to be the only way to do. Its your responsibility if any damage occurs. If you are not sure of any part of these instructions, feel free to send us an email, we would be happy to help.

There are many small pieces involved with this. So proceed with caution, use common sense and proper safety measures.

Please be aware that we are not responsible for any damages that happen. By using this guide you understand that we have made this only to make installation easier for you. However, do to the age of these things, every gauge cluster has been through a different life.

TOOLS NEEDED:

– Assortment of philips screw drivers

– needle nose pliers

– flat screw driver

– a little patience

TIME NEEDED:

– About 45 mins. This is something that takes patience. You’re dealing with lots of tiny pieces.

STEP 1

Remove the 9 Philips screws in the back of your gauge. When placed down, be careful not to brake the tabs!
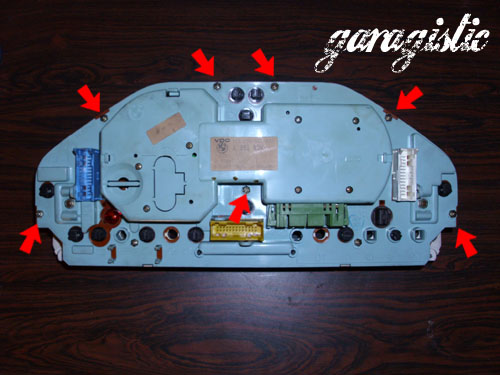
STEP 2

When removing rear panel, take note of the two lower tabs and be sure to pull straight up or damage to connectors inside may happen.
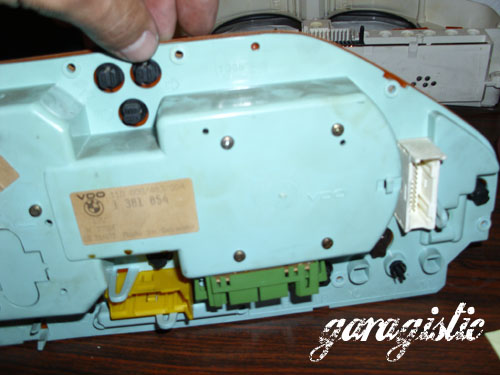
STEP 3

Remove the 4 Philips screws that hold the odometer in place. Before you try to take out the cluster, do not forget the connector at the bottom. There are tabs that hold it in place. Once this is out you can pull straight out because there are connectors holding. DO NOT BEND! We found its best if you hold the cluster as it was placed in the car that way it doesn’t fall out.
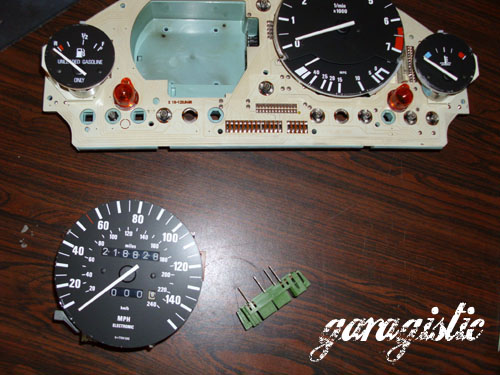
STEP 4

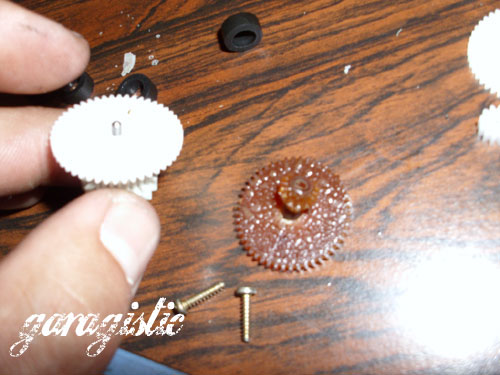
When odometer is out, you will see the gears on the side. There should be three. See the damage.

STEP 5

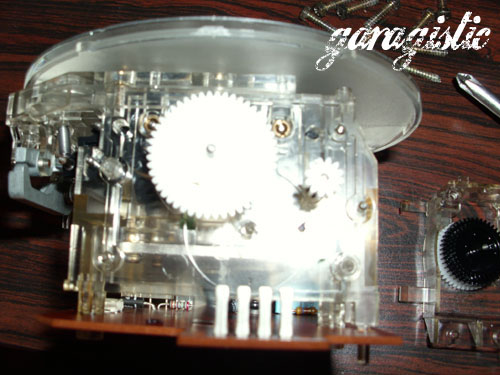
There are two screws holding a clear cover over the gears. Remove them.
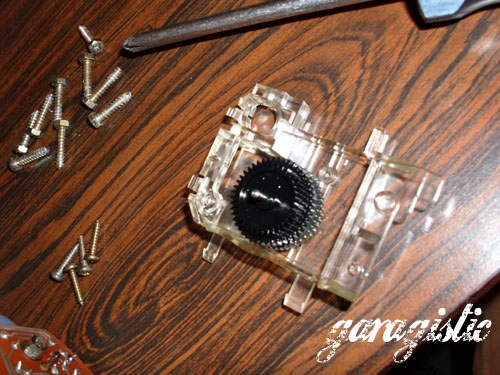
STEP 6

The gears can then be replaced in the order they are taken out. They fit in an interlocking stacking setup. Notice that the gears are very soft and will fall apart as you try to remove them. NOTE: There is a brass bushing on the smaller 12 tooth gear. Its on the shaft and needs to be removed to install the new gear. You do not need this bushing with the new gear. DO NOT TRY TO PULL THE BUSHING OFF WITH ANY TOOLS AS THIS WILL DAMAGE THE MOTOR. Best way is to use a pair of pliers and lightly squeeze the bushing from one side, then the other. Then it ill slip right out. Do not use too much force!

Dont forget to install out spacer to keep the gears spaced correctly. DO NOT PUSH IT ALL THE WAY DOWN AGAINST THE GEAR. THIS WILL CAUSE THE GEARS TO BE PINCHED AND NOT BE ABLE TO MOVE!

STEP 7

Put together in reverse order. Be sure you have gotten all the old pieces of the gears out so you have no future problems. Before closing everything up be sure to run the gears by hand to make sure everything is right and working correctly.

ENJOY! No more guessing when the next oil change is!

0
222

on

If you have bought a Garagistic Oval shifter bushing, round shifter bushing, or any shifter bushing kit, you may have noticed that one bushing fits perfect and the other side might appear “loose”. 

Here is the reason for it and why it will not affect the performance of your new shifter bushing installation:

The original Aluminum cast BMW Shifter carrier (the part this bushing gets pressed into) is a tapered hole. This is because in the making of a cast part (like your OEM shifter carrier), they need to be able to form a hole and have it release easily in mass production (hence the taper). Aluminum die casting with holes cannot be cast without that taper. When you look at your carrier housing, you will notice a split lines where the two halves meet. You will also notice that the part where your shifter bushings get pressed into is actually 2 different sizes.

Having said that we make our bushing to be universal to avoid assembly errors. (If the bushing was customized based on the taper and was accidentally interchanged, it’s easy to permanently damage one bushing )

We maintain a nominal dimension so it can be interchanged. Though it seems one time tight fit on one end and easy fit on the other end, this will not only make it easy on the assembly but will not affect the performance of the shifter itself.

One solution would be to make 2 different bushings (one for each side). This will increase cost for customers on a part that is meant to be an affordable modification. It can also make it possible to install incorrectly. This is not a feasible solution.

The other solution (what other competitors do), is to make bushing bigger to make it fit both sides tight. In that process, one bushing still fits better than the other. The only difference is that the one that was “smaller” is not a super tight fit and will push on the pinhole making it impossible to push bitch clip though. This is not a good solution but has been an industry standard for these parts. It means you will not find out why the “bitch clip” got its name until you are in the middle of installation under your car. Turning your simple upgrade into a nightmare job. 

This will not affect performance because the lip on the bushing stops all side to side play when installing on the transmission (where the bitch clip goes through). Once installed, it is tight so side to side play is eliminated. The center hole where the clip goes through does the rest of the work. It’s very accurate for the bitch clip that goes through it. So that eliminates forward and back play. Between both of those concepts, all play is eliminated so one bushing being tighter then the other makes no difference!

TOO LONG DIDN’T READ CLIFF NOTES:

  1. OEM shifter carriers are originally Aluminum die casting and the hole cannot be cast without that taper in the shifter hole area (where the bushing goes in).

  2. We cannot make 2 different size bushings for this. Our shifter bushings are be universal to avoid assembly errors and keep costs FOR YOU low. (If the bushing was customized based on the taper and was accidentally interchanged, its easy to permanently damage one bushing )

  3. Once installed: 1 tight bushing and 1 “loose” bushings will still eliminate front and side to side play as originally promised. Meaning the part will work as intended and you will be very pleased with your shifter play eliminated!

  4. Competitors make both bushings oversized making them a press fit which will shrink the middle hole making it impossible to install pin after that without drill bushing. Its how the clip got its famous name of “bitch clip”.